Spring Boot 打包成Jar包运行的原理
相比于传统的Java打包方式,使用SpringBoot打包插件打包成jar包后,可以直接使用java -jar 运行SpringBoot项目,本篇就来分析一下运行的原理。
SpringBoot打包插件
1 | <plugin> |
打包完后会生成两个文件,一个***.jar和***.jar.original
.jar文件是SpringBoot打包后生成的文件,.jar.original是用原生方式打包生成的文件,对比一下两个的区别
.jar.original文件

.jar文件
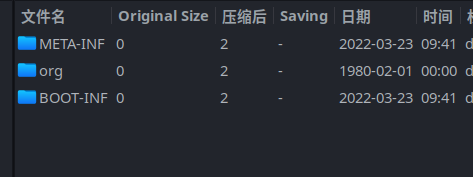
.jar.original就是普通的jar打包的结构,这里主要看.jar文件的结构:
META-INFO目录:META-INFO/MANIFEST.MF里包含了jar包的元数据,包含了项目的启动类等信息.
org目录:该目录下包含的是启动项目的一些类,启动的过程就在这个包里。
BOOT-INFO目录:本地项目的代码(BOOT-INF/classes),以及所需的依赖(BOOT-INFO/lib)
重点在META-INFO/MANIFEST.MF里:
1 | Manifest-Version: 1.0 |
这里有几个重点的字段
- Main-Class :jar包启动类,这是java规定的字段,存在这个字段的情况下, 在
java -jar时,jar包才会运行起来 - Start-Class:本地项目的启动类
- Spring-Boot-Classes:加载应用类的入口
- Spring-Boot-Lib:项目所需的依赖
有了Main-Class启动类,那就直接进入到JarLauncher里查看运行的过程
1 | public static void main(String[] args) throws Exception { |
在JarLauncher的main方法里调用了launch方法,launch方法的具体实现在JarLauncher的抽象父类Launcher中实现
1 | protected void launch(String[] args) throws Exception { |
首先获取了类加载器。
然后获取jarMode,再根据jarMode获取launchClass,如果没有设置jarMode,则根据
getMainClass方法获取,getMainClass的具体实现在ExecutableArchiveLauncher中实现1
2
3
4
5
6
7
8
9
10
11
12
13protected String getMainClass() throws Exception {
Manifest manifest = this.archive.getManifest();
String mainClass = null;
if (manifest != null) {
mainClass = manifest.getMainAttributes().getValue("Start-Class");
}
if (mainClass == null) {
throw new IllegalStateException("No 'Start-Class' manifest entry specified in " + this);
} else {
return mainClass;
}
}
在getMainClass里获取了MANIFEST.MF文件里Start-Class字段的值,也就是本地项目的启动类。
最后调用
this.launch(args, launchClass, classLoader);1
2
3
4protected void launch(String[] args, String launchClass, ClassLoader classLoader) throws Exception {
Thread.currentThread().setContextClassLoader(classLoader);
this.createMainMethodRunner(launchClass, args, classLoader).run();
}调用
MainMethodRunner的run()方法
1 |
|
在run()方法里通过反射拿到了项目的启动类的main方法,从而启动本地项目。
 微信公众号
微信公众号